 Iran’s Attack on Israel
3 min read
4 min read
4 min read

15 min read
Indian spices and an entirely new way to see rice in your kosher kitchen.
Excerpted from Remaining Kosher Volume One: A Cookbook for All with a Hechsher in Their Heart
One of my many quests in writing Remaining Kosher Volume One is showing the vibrant pulse of kosher cooking at this present moment: a more energetic and elastic cooking that can tumble with ease onto your plates. This cookbook taps into a vital flow that happens as sure as any charged electrical current.
This flow runs underneath a proverbial ancient highway, linking up many cultures’ traditional recipes and right on through the mezuzah guarded door.
Remaining Kosher begins with a glimmering of brother spice blends and sister spice pastes recipes as they have been used over many lifetimes – often through other people’s grandmothers and then their children. Most of these blends and pastes are simply not available kosher.
These recipes will become resources that punch up taste and, just as important, maximize your time. The purchase of a small inexpensive electric coffee grinder will get you into the habit of blending spices with ease.
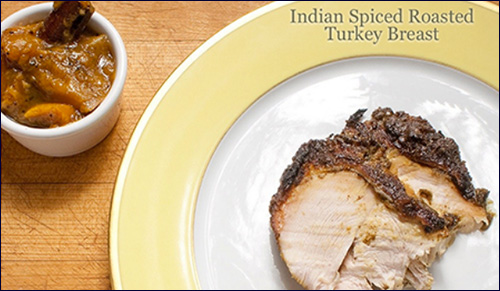
I begin these recipes choices by transporting your kitchen into the heart of an Indian spice bazaar by making a spice blend known as Garam Masala. In the Indian Spiced Roasted Turkey Breast recipe, this blend will give birth to a paste and an entirely new way to see a roasted turkey breast.
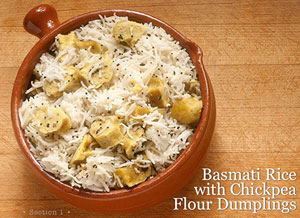
The recipe for Basmati Rice and Chickpea Flour Dumplings is ample proof that we can redirect the everyday flow of cooking thoughts and unleash an entirely new way to see rice in your kosher kitchen.
Finally, the food world is brimming with untold dessert riches without shortchanging your sensations by using faux kosher substitutions. In the included cake recipe, olive oil is deliciously redirected to a conversation started long ago in Italy and Spain.
Enjoy!
One rite of passage for Indian cooks is learning to become a masalchi, or spice blender. I suggest that this very action may be one part of the ongoing conversation in Remaining Kosher.
You, too, can become your own spice blender.
Buying a small electric coffee grinder will get you into this habit with ease.
These grinders are cheap and cheerful – they accommodate your household and provide the hard currency of fresh spices.
Spices are still precious commodities: simply stated, they awaken a sleepy palate.
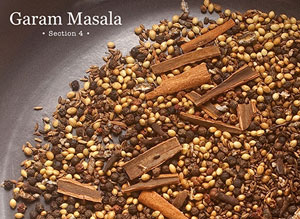
Garam Masala is a blend of spices – there is a careless freedom to it. Most Indian housewives make their own blend. You, too, can share this living connection.
I give you a starting recipe that has poise and balance. I assure you that Garam Masala will amplify whatever you sprinkle it on.
The point is this: you may heighten the spice with your own emphasis.
I use the bottom of a small frying pan to break up the cinnamon stick before placing in the toasting pan.
I also introduce you to Szechuan peppercorns.
Honestly, these are a world away from any reference point for what you may think are peppercorns.
Szechuan peppercorns are the fruit of the prickly ash.
They are small and round, yet have an explosive seed in the middle.
And they are not really part of the peppercorn family.
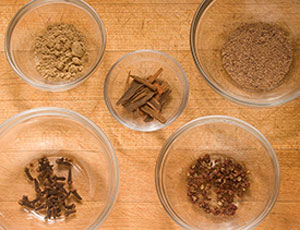
But Szechuan peppercorns tell the tale, enlivening our blend and your tongue by adding a hint of citrus.
Find Szechuan peppercorns at the Chinese grocery; find the green cardamom seeds at your Indian grocer.
Simply stated, they are well worth the excursion.
However, don’t deny the fragrant additions to your own blended Garam Masala for your spice shelf.
The first blend simply represents my continuing conversation with the masalchi that resides within me.
All the ingredients for the second blend are at your normal grocer. This blend is wise and sturdy, mirroring an Indian bazaar.
Both blends will inform any meat, fish, vegetable or grain.
Garam Masala Blend #1 Ingredients
Special Equipment: electric coffee grinder, pastry brush to clean
Yield: approx. 1 cup
Blend #1 Method
Use a dry heavy skillet over medium heat. Put in the cumin, coriander, cardamom, black peppercorns, broken cinnamon stick and cloves (optional: Szechwan peppercorns).
Toast the spices until they turn darker and release an earthy, smoky aroma – about 4-5 minutes.
Avoid high heat that may lead to rapid burning.
Spread the toasted spices on a plate to cool.
Transfer a little at a time into the spice grinder
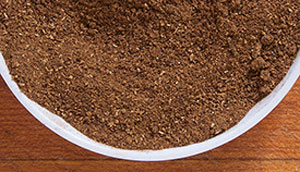
Grind into a powder, then empty the powder into a bowl. Grind a little more, repeat.
When all the spices are ground, stir in the grated (or pre-ground) nutmeg and the ground ginger.
Store your Garam Masala in glass jars. Label and store with your spices.
Garam Masala Blend #2 Ingredients
Blend #2 Method
Use a dry heavy skillet over medium heat.
Put in the peppercorns, coriander seeds, broken cinnamon and cloves.
Toast the spices until they turn darker and release an earthy, smoky aroma: about 4-5 minutes.
Avoid high heat that may lead to rapid burning.
Spread the toasted spices on a plate to cool.
 Transfer a little at a time into the spice grinder. Grind into a powder, then empty the powder into a bowl.
Grind a little more, repeat.
When all the toasted spices are ground, stir in the grated (or pre-ground) nutmeg, the ground cardamom and the ground ginger.
Store your Garam Masala in glass jars. Label and store with your spices.
We live in a rice-eating world. There are so many varieties of rice from many parts of the world. Walk into an Indian grocery – they are everywhere now – sacks of rice assume their importance by being presented near the entrance.
A rice paradise awaits: you will have direct contact with a remarkable staple food that many in the world take for granted.
Basmati rice is different. Have you cooked real basmati?
Once cooked, the grain is elegantly long and narrow. It bears no resemblance to our common vision of rice.
The basmati rice is first washed and soaked to insure the grains cook evenly. The final taste perks your interest: it enchants.
Known as besan flour in India, I am again calling upon chickpea flour to perform one of its many gluten free tricks. Find this flour at health food stores or an Indian grocer.
Here, chickpea flour is made into a dumpling.
Kindred spirits of the matzoh ball, these dumplings are quicker to cook. While existing in the same universe as any dumpling, these are not soup oriented.
The dumplings in this recipe are there to add a lusty and weighty presence into the mix. These are bite-size card-carrying carbohydrates.
The dough is sticky! How to handle and tame? Oiled palms make all the difference. Your hands will be mirroring what has been done in India for a thousand years.
This dumpling recipe is terrific for a first time novice. I am interested in you partaking in the fun.
To really get a taste and the feel of South Indian cooking, add in ¼ teaspoon of your own Garam Masala; or a teaspoon of green chopped chilies.
I am so sure that you will enjoy learning to make these dumplings: they are included in two recipes – the other in this chapter: Cashew Yogurt Curry.
In this recipe, the dumplings are embedded and cooked along with fragrant basmati rice.
Indians know how to cook rice. You will want to use this method again and again.
Chickpea Flour Dumpling Ingredients
Yield: 6 servings
Special Equipment: measuring cups and spoons, one-quart saucepan, mixing bowl, one plate lightly oiled
Chickpea Dumpling Method
Cover and bring 4 cups of water to a low boil.
While the water is heating, make dumplings.
Lightly oil a 6” plate.
Have all your ingredients primed and at arms-length.
Place the sieved chickpea flour in a mixing bowl. Add in all the coriander, turmeric, Garam Masala (optional), Kosher salt, ginger and the Ghee or vegetable oil.
Rub the ingredients together, blending them. Add in the yogurt. Stir until mixed.
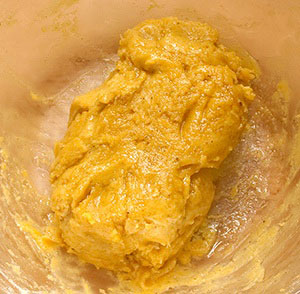 Oil your hands. The dough will be sticky!
Place a teaspoon of oil around the edges of the dough. Roll the mound of dough back and forth over the oil with your oiled hands.
Form the dough into a mound.
Lightly oil your hands again.
Divide into four equal parts.
Form each into a 4” log. It’s OK if the logs aren’t evenly rolled.
 Place the formed logs on the lightly oiled plate.
Use a rubber spatula to push each individual log gently into the simmering water. Bring back to a low boil.
Slowly boil for 3 minutes. During that time, gently move the cooking dumplings to insure they are not sticking to the bottom.
After 1-2 more minutes, they will float to the surface.
 At that point, use a slotted spoon to take them out. Drain on a paper towel. Cool.
Cut all the logs into ½ inch pieces.
The dumplings can be frozen at this point.
Basmati Rice Ingredients
 Yield: 6 cups cooked rice
Special Equipment: bowl for washing and soaking rice, colander, 1 quart saucepan, wooden spoon
Basmati Rice Method
In a bowl, cover the basmati rice with water. Drain. Repeat two more times.
Place into 2½ cups of water and soak for 20 minutes.
When ready to proceed: place your saucepan over medium heat, add in the ghee (dairy) or vegetable oil (parve).
Add the cumin and mustard seeds and let sizzle for 15 seconds.
With a rubber spatula, scrape the rice (along with its 2½ cups of water) into the saucepan. Add the salt and stir for 5 seconds.
Finishing
If using: add in the cut chickpea flour dumplings (dairy). Stir again to gently mix with the rice.
Bring the saucepan contents to a boil, then cover. Adjust the heat to low and cook the rice for 15 minutes.
Let the rice sit covered on a cool burner for another 10 minutes: it will continue to cook.
Uncover, salt and pepper to taste.
Serving
Place the rice and dumplings into a covered dish and bring to the table.
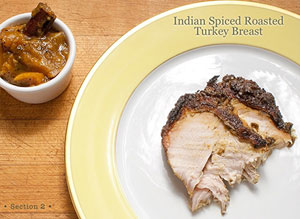 If you will, a turkey breast with attitude. There are no vague results here. All of the spices being used will eagerly persuade the neutral turkey to like its exotic setting and have a little more conviction.
I call upon a simple Garam Masala Spice Blend #2. The food processor will then be used to blend both the dry spices with the wet spices to form a paste.
The pleasant pursuit of a wet marinade always enlivens any food preparation.
The turkey breast sits for a few hours in the spice paste while bagged in the fridge. The bag’s chamber contributes considerably to the spice paste courtship and acceptance.
The cold leftovers are just delicious the next day. It is perfect food for Sabbath day sandwiches.
for the marinade:
for cooking:
garnish:
optional:
Yield: 6 servings
Special Equipment: electric spice grinder, extra large zip-lock storage bag or container, rack and roasting pan
Method
First make the simple Garam Masala (yields about 1 cup). You will be using two tablespoons. Shelf-store the remainder of this spice (preferably in a lidded jar).
In the food processor bowl, combine the ingredients for the wet marinade: the vegetable oil, garlic, ginger, salt, pepper, turmeric and sugar.
Add the dry ingredients to the wet marinade ingredients. Grind them all together to a fine paste – about two minutes.
Open a zip lock bag (or container) large enough to accommodate your turkey breast. Keep it close.
Use a rubber spatula to take the paste out of the processor into a bowl, one that can accommodate the turkey breast.
Spread the wet paste over the entire surface. Gently lift under the skin – place more paste underneath.
Rinse your hands.
Place the turkey breast and any remaining paste inside the plastic storage bag (or container) and seal.
Leave the turkey to marinade for at least five hours.
 Preheat the oven to 400 °F.
Place the turkey on a rack in a roasting pan – add 2 cups of water or stock.
Roast for 1 hour or until the turkey is cooked through – this depends on the turkey breast size. The liquid should run clear when you stick a knife into the breast.
Remove from the oven, rest for 15 minutes.
Add in 1 more cup of chicken stock or water to the bottom the roasting pan.
Place the roasting pan over a medium heat. Reduce and concentrate the juices, scraping and stirring the bottom of the roasting pan until about a cup of liquid is left.
 Finishing
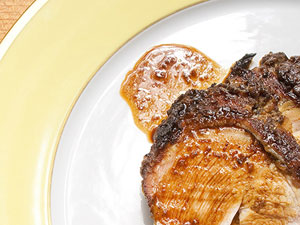
Slice the roasted turkey breast just before serving.
Squeeze lime juice into the remaining sauce. Spoon the warm sauce over the slices.
Garnish the platter with handpicked coriander leaves.
Pass extra sauce at the table.
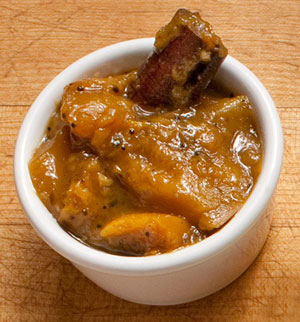
I like to serve this turkey recipe with Mango Chutney and Basmati Rice and Chickpea Dumplings.

A unique technique is used to make this moist sponge cake that is loaded with vibrant, sunny flavors.
I ask you to boil lemons and oranges until soft. You put the rind into the work bowl of the food processor: puree with sugar and the “caviar” of a vanilla bean pod.
Olive oil enriches the batter and lends its fruity goodness. The roasted pine nuts announce their presence as you chew.
In the middle of winter, a slice of this cake will add a bit of sunshine to your dessert.
Yield: 8-10 servings
Special Equipment: saucepan, toaster oven, food processor, standing mixer, whisk attachment, 8’ cake pan, parchment paper
Garnish: powdered sugar
Method
Take the eggs out of refrigerator and bring to room temperature.
Place both oranges and lemons in a saucepan. Cover with cold water; bring to a boil on the stove. Simmer covered for at least 45 minutes.
Discard the water. Place the boiled fruit on a paper towel and cool.
Cut a circle of parchment the same size as the bottom of your cake pan. Place the parchment circle on the bottom of the pan. Brush the pan with olive oil and then dust with flour. Shake out excess. Set aside.
Toast the pine nuts in an oven (or toaster oven) at 350 °F until the nuts are golden brown. (Attention!)
Dice the mango and pineapple.
In a bowl, pre-sift the flour, baking powder and salt together.
Split the vanilla pod in half and scrape all its inner “caviar” atop the cup of sugar.
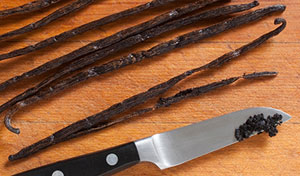 Hint: place the used pods in your sugar canister.
Cut the cooked fruit in half. Use a teaspoon to scoop out all the insides of each half and discard. You will use the rind.
Place the cooked rind, dried fruit, sugar and vanilla bean into the food processor bowl and purée.
Stop the machine and scrape down the sides and continue, processing for about a minute. With a rubber spatula, scrape out the puréed ingredients into bowl.
Finishing
Preheat oven to 350 °F (convection if available).
Place all the ingredients near the standing mixer. Attach the whisk.
Break and check the eggs. Add into the standing mixer bowl. Beat the eggs on high speed until they are very fluffy: about 2-3 minutes.
Add in the fruit purée. Beat on a higher speed until the mixture is pale and holds a shape: about another 2 minutes.
On a lower speed, beat in the flour until just incorporated. Beat in the olive oil.
Finally, add in the toasted pine nuts. Stir with a rubber spatula to insure there are no hidden flour pockets.
Fill your mold with the cake batter. Even out the surface with the back of the rubber spatula.
Place the mold in the middle of the oven and bake for 50 minutes: an inserted skewer or knife will come out clean when the cake is done.
Cool to room temperature.
Serving
Place a plate over the mold, flip and slip the cake out of the mold.
Remove the parchment paper. Flip again onto a serving platter.
Use a fine mesh strainer to sprinkle powdered sugar generously on the cake top.
Click here to see the eBook at Apple. Or visit: LaurenStacyBerdy.com.