 Iran’s Attack on Israel
3 min read
4 min read

21 min read
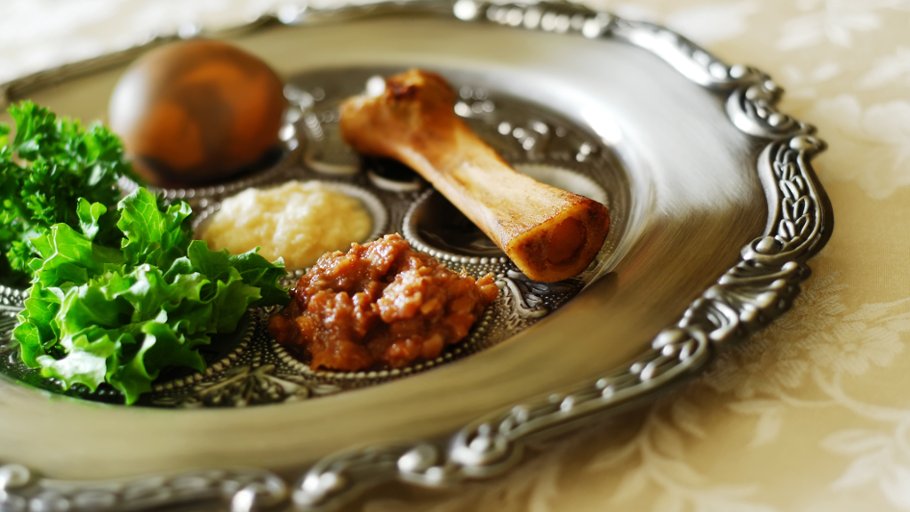
There are so many special ways to use a piece of matzah in cooking. How can something so simple be this delicious?
Excerpted from Remaining Kosher Volume Two: A Cookbook for All with a Hechsher in Their Heart. Click here to see the eBook at Apple. Or visit: LaurenStacyBerdy.com.
Bring on the ever versatile matzah! Happy Passover!
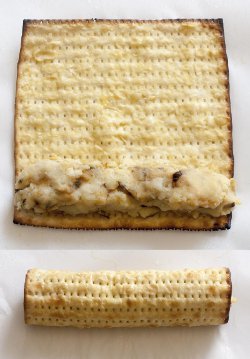
It’s Passover again. Time to play with matzah! A sheet of store bought matzah can have many hidden guises.
This recipe is also about cooked onions in chicken fat.
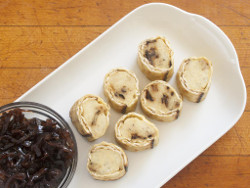
I call these "knishes" because there is a filling inside a baked dough. The baked dough here is matzah. In this recipe, the matzah sheet first has to get softened with an easy and approachable technique.
Next, the matzah is topped with a stuffing, then rolled up and baked.
Before serving, each roll is cut sushi-style. Again duplicating sushi, these rolls are eaten by the piece.
I use chicken fat in spades. And nothing beats a heavy black iron skillet to cook those onions.
Potatoes are just about my favorite food. Here they are folded in with those onions slow-cooked in chicken fat.
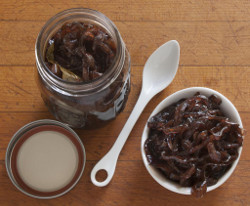
Note: make the delicious Manischewitz Red Onion Preserves. Put atop the potato "knish" and eat. Yum.
Yield: 4 rolls (making about 28 sliced pieces): about 2 cups mash filling
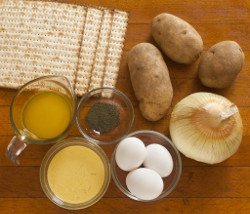
Special Equipment: skillet, sauce pan, potato masher or standing mixer and batter hook, half baking sheet pan, or large aluminum foil disposable for dunking matzah, bowl, (optional) pastry brush, parchment paper, foil
Combined during finishing:
Optional Garnish: Manischewitz Red Onion Preserves (recipe below)
To cook the onions:
Melt in the chicken fat in a heavy black iron skillet (preferable).
Add the onions, kosher salt and pepper. Cook over moderately low heat, stirring occasionally, until the onions soften and just start to brown- about 15 minutes.
Turn the heat down to low. Cook the onions for another 20 minutes, stirring occasionally, until the onions become darker. Some will have crispy edges.
Remove from heat. Set aside.
Meanwhile, place the cut potatoes in water to cover. Cook at a brisk simmer until tender.
Drain the potatoes. Mash with a potato masher (or standing mixer with batter attachment on low). Lumps are allowed!
Beat in the cooked onions and all the remaining fat. Taste for seasoning. Scrape into a bowl and cool.
Add the beaten egg into the cooled potato-onion mixture. Combine thoroughly. Taste for seasoning: I like even more freshly ground black pepper in my mash.
Finishing
To prepare the matzahs to be filled with the potato mixture:
Combine the egg and water in a small bowl. This will be used during rolling.
Whisk together the eggs, water, salt and pepper. Pour the liquid into a half baking sheet pan with sides (or a large disposable aluminum pan).
Tear or cut 4 pieces of parchment, each a little larger than the matzah. Tear off the same amount of foil.
Place two pieces of foil down on the counter top. Place one piece of parchment centered over each piece of foil. Brush the top of each sheet of parchment generously with vegetable or olive oil.
Turn the hot water tap on and wait until the water turns baby bottle warm. Pick up one sheet of matzah. Quickly soak the piece of matzah quickly underneath the warm water, then turn the water off.
Place the first matzah into the egg wash filled sheet pan/ aluminum disposable pan. Repeat with the next piece of matzah: two pieces of matzah should be able to soak side by side in the egg wash.
Using both hands, carefully turn over each piece of matzah after five minutes. Let soak for 15 minutes.
Again with both hands, carefully pick up one piece of matzah from its egg bath. Let the excess egg wash drip back into the pan. Place the matzah 2” from the nearest edge of the first oiled parchment. Repeat with the other piece of soaked matzah, placing it on another piece of oiled parchment.
Let these sheets of matzah sit for another 10 minutes. This insures a pliable piece of matzah.
Repeat the above soaking/softening procedure with the two remaining matzahs.
Filling and rolling "matzah" knishes:
Paint the surface of each prepared soaked sheet of matzah with the egg-water.
Measure out two cups of the potato filling and place into a mixing bowl. Based on 4 rolls, each roll takes ½ cup of filling.
Measure out a ½ cup of potato filling.
Distribute the filling evenly an inch from the edge directly in front of you.
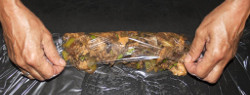
Lift the parchment up and over the roll. This begins the rolling. Fold the oiled parchment over the matzah and filling (the matzah should be soft enough so that it will bend). Keep rolling using the parchment edge to guide you as you go up, forming a log.
Sometimes the matzah cracks: that’s fine, keep going. Continue to roll the log into the remaining parchment.
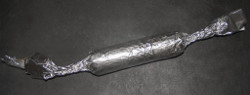
The filled log will now be at the top of the sheet of foil. Roll the foil/parchment over the filled log and back down towards you: the log will now be sealed in foil.
Tightly twist the ends like a tootsie roll: his will tighten the log. Then bend each foiled end up.
Fill and roll the other prepared sheets of matzah.
Note: the uncooked, filled and rolled knishes could now be refrigerated for one day.
Preheat oven to 350 °F.
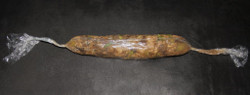
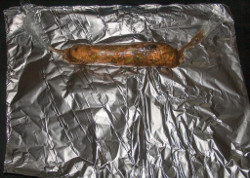
Place the foil wrapped logs on a sheet pan. Bake for 20 minutes. Remove. Snip off both ends once cool enough to handle. Unroll; discard both the foil and parchment.
Use a sharp knife to cut each roll into 6-7 pieces.
Serve
Reheat the Manischewitz Red Onion Preserves
Place the warm knishes on serving platter.
Serve with the preserves and a small fork.
To reheat cut knishes: place on a microwavable proof dish. Cover the knishes with a wet paper towel. Microwave for 10 seconds.
Why not use the natural sugar content and inherent spice of Manischewitz Concord Grape Wine to do something besides build your Passover charoset?
This red onion preserves can become a sidekick waiting inside your fridge. Microwave the prepared preserves to baby bottle warm, and then serve along with a roasted chicken or turkey.
Spoon the preserves atop the Passover potato knishes or the Chanukah latkes. Or place a bowl of the preserves alongside the chopped liver during Yom Kippur breakfast.
Why should food ever walk alone if it can have a traveling companion?
A condiment is companion food. It is the Ollie to the Stan.
More life happens in pairs. Camaraderie can happen on the plate as well. Condiments animate cooked and raw food, playing one taste against another.
They socialize together, forming an alliance that can possibly be beguiling to the eater. Or not…
I like ketchup with my eggs, a combo I inherited from my father. I also quickly learned that it’s not for everyone.
Red Onion Preserves ain’t ketchup on eggs, and you do have to like onions…
This condiment is way more user friendly and won’t be sneered at.
This recipe is very easy to prepare and could easily slip into your life somewhere between the ketchup and the mustard.
Yield: 2 cups
Special Equipment: bowls, optional mandoline, optional potholder, saucepan, wooden spoon, jars with lids or container
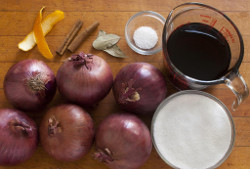
Onions:
Using a mandoline:
Put the mandoline with the slicing attachment across the width of the bowl. Slip a potholder on your working hand for extra safety. Thinly slice the onions into ¼” rounds.
Or by hand:
Use a sharp knife to thinly slice the onions.
Put the sliced onions in a bowl. Add in all of the ingredients and stir. Make sure that the spices are embedded and not just on the surface.
Seal the bowl.
Let the contents sit at room temperature for at least 8 hours.
Finishing:
Scape the ingredients into a wide saucepan. Simmer over medium heat. The liquid will start to boil. Turn down heat to a low simmer. Let the onions cook for about 45-50 minutes.
There should be about ½ cup of liquid remaining. If not, continue cooking
Remove saucepan from heat. Put a few onions and liquid on a plate. Put the plate in the freezer for 5-8 minutes. Remove the plate from the freeze. The liquid may be in a jelly like stage and stay separated when you run your finger through.
If not, cook for a few more minutes and retest. Scrape the sample back into the pot.
Place the cooked preserves in clean washed and dried canning jars while still warm and seal. Turn the jars upside down on counter and let cool.
Alternately, store in a sealed container.
Refrigerate.
Serve:
Microwave the preserves to baby bottle warm before consuming.
Manischewitz Red Onion Preserves are best eaten within 3 months.
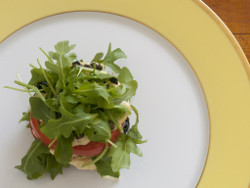
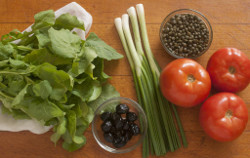
with Arugula, Capers, Moroccan Oil Cured Olives and Green Onions
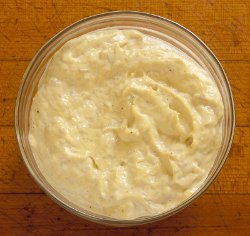
A homemade mayonnaise is the birthright of this Italian tuna sauce. Italians know how to make a great mayonnaise. They use only egg yolks, salt and fruity olive oil. An emulsion happens between this troika and the miracle of Italian mayonnaise is born.
The simple act of a few drops of fruity olive oil continually whisked into egg yolks and salt will magically emulsify into a glistening sauce as thick as oil paint. A food processor will handle the constant mixing while you handle the judicious droplets of olive oil.
And then, you, too, will taste the wonder of a true mayonnaise.
This mayonnaise is then transformed into a tuna sauce by mixing in puréed canned olive oil tuna.
The tuna sauce is then used to cover each tomato slice with a blanket of divine silkiness.
Between each slice, a few leaves of arugula, olives, capers and green onions are sandwiched in, then used a final fanfare of garnish topping.
Choice ingredients are everything here. Buy a fruity extra virgin olive oil, good organic eggs and select tomatoes that have a reason for being.
Yield: 4 servings
Special Equipment: food processor, mixing bowl
Mayonnaise Ingredients
Garnish
Tuna Mayonnaise:
Make sure the eggs are at room temperature. If refrigerated, just place them in warm tap water for 20 minutes.
Pour out the olive oil into a glass measuring cup. A spout will help to administer a slow, steady pour.
Separate and check the eggs. Keep the whites for another recipe. The whites can be frozen.
Have all the ingredients ready and within each reach.
Plop the yolks into the food processor bowl. Process the yolks for 5 seconds.
Add in the salt. Keep the motor running while slowly pouring 5 teaspoons of olive oil.
Wait another 3 seconds (motor running), then add in another 5 teaspoons.
Wait another 3 seconds (motor running) add in another 5 teaspoons.
The eggs will have absorbed all the oil that was admitted.
With the motor still running, add in all remaining olive oil in a very thin stream.
The mayonnaise should look glossy and thick like oil paint!
Keep the motor running. Squeeze one or at the most two drops of lemon juice into the mayonnaise (it’s not lemon mayonnaise). Process for 2 more seconds.
Scrape the mayonnaise out into another bowl. Don’t clean the processor bowl.
Open the tuna can: use its lid to press out all the oil.
Scrape the tuna into the food processor work bowl, then process for 5 seconds.
Scrape it out the tuna into the mayonnaise. Combine the two with a wooden a spoon.
Finishing:
Prepare the garnish: Trim the arugula stems. Roughly chop the olives. Slice the green onions.
Get out over-sized plates.
Core and then slice each tomato into ½” thick slices. Lay one tomato slice down, centered on each serving plate.
Serving:
Spread a thick layer of mayonnaise over the surface of the plated tomato slice.
Drop leaves of arugula over the slice. Scatter olives, capers and green onions about.
Build 2 more layers of tomato, mayo and garnish (a little extra garnish on the top one).
Pass any leftover dressing at the table.
Ideally, supply a sharp knife for each plated serving.
Note: Tomato Tuna Tonnato makes a splendid Passover lunch. Pass the matzah!
Note: The tonnato mayonnaise can be made, sealed and refrigerated three days before.
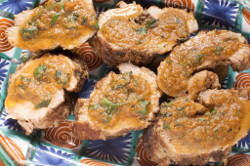
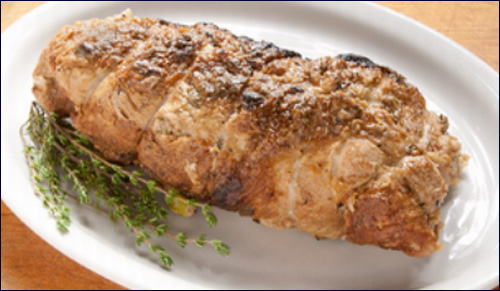
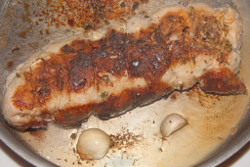
Have you ever cooked a veal brisket? No, not a veal breast- I am talking of its meatier cousin the brisket. The meat is succulent, rich and has its own cachet. After all, it is veal and veal brisket just has a different pedigree.
I enliven the meat even more by studding the raw brisket with shelled pistachios. Tucked in and embedded, each slice comes with the nut’s own green buttery charm.
This recipe is perfect for the Passover holiday table. Once made, the braised meat can be sliced, placed in its serving dish and later reheated with ease.
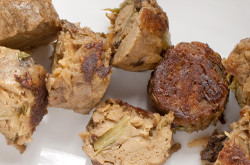
Unlike a beef brisket, this veal is rolled and ready to be portioned into medallions.
The meat sits pretty on the dinner plate, shoulders above the other foods.
Speaking of height, try serving the veal sitting atop a sturdy, thick slice of Wild Mushroom Pudding (following recipe) that is made with matzah farfel. This pudding and the veal are made for one another.
As in any braise, the sauce practically happens almost by itself and adds its wonderful luster.
You have fed the cooking pot all the necessary ingredients. Now walk away and do something else during the 2 - 2½ hours of seasoning and cooking.
Yield: 6-8 servings (depending on the veal brisket size)
Special Equipment: small paring knife, meat cutting board, butchers string, scissor, braising pot, kitchen spoon and fork
Garnish: Basil leaves: washed, checked and dried
Place the pistachios into a small dish. Place the veal brisket fleshier side up in front of you on the cutting board.
With the tip of a paring knife, make a ¼” incision into the meat. Lodge a pistachio into the incision. Repeat until you have inserted about 30 pistachios evenly over the surface of the meat.
Scatter the fresh thyme leaves over the surface. Sprinkle with salt and pepper.
Begin to roll the meat up. Starting at the narrowest point, roll the meat into a tight jellyroll, seam-side down on the cutting board.
Cut 7 pieces of butcher's string about 8” each.
Place the meat in front of you, perpendicular to the cutting board. Using both hands, place the first string under the beginning of the roll and tie so that it touches the meat and feels snug.
Repeat until the meat is neatly packaged.
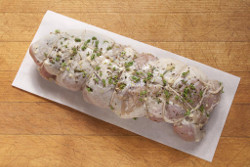
Make a large seasoning bundle (bouquet garni) with the fresh thyme, parsley and bay leaves and tightly wind another piece of butcher string around at least three times. Cut and tie.
Sprinkle the surface of the meat with salt and pepper. Sprinkle on an even coat of potato starch.
Over medium-high heat, pour 4 tablespoons of olive oil and two garlic cloves into braising pot and brown the veal on both sides (about 6 minutes a side). Remove the veal.
Add in the carrots, onions, celery and celery leaves. Cook for two minutes.
Pour the wine into the braising pot. Reduce wine by half. Scrape the bottom of the pan as the wine reduces.
Add the tomato paste, chicken stock (or water) and stir.
Bring to a low simmer. Return the veal to the pot. Place the seasoning bundle (bouquet garni) into the pot. Place a piece of foil over the pot rim. Place a lid over foil and cook on low about 2 hours. The meat should be knife tender. Cook more if necessary.
Save the sauce separately if serving later.
Remove the veal from pan and let cool. Cut all the strings and discard.
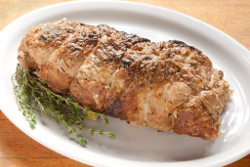
Serve
On high, cook the sauce about 5 minutes to thicken it a bit. Add a few drops of lemon. Taste for salt and pepper.
Slice the veal into 2” portions and moisten with sauce.
Pass additional sauce on the side.
Alternatively, refrigerate the veal and sauce separately overnight, then reheat the next day.
If serving with the Wild Mushroom Pudding:
Follow the recipe directions, but place each veal medallion atop the warm, sliced Wild Mushroom Pudding. Add sauce and basil leaves.
Don’t attempt to pigeonhole starches. They are unsystematic in their flexibility. Starches also fill us with admiration. I cook and eat all of them (at least the ones I know about- there are many to still discover).
This simple savory pudding was birthed into being from leftovers. It has a natural correspondence to what the Italians have probably done for centuries- but theirs has a factor of cheese. This recipe has a factor of potatoes.
A few basic ingredients form a poetic companionship and take an unexpected direction. The ingredients get formed into a log and sealed, then poached in water.
This process makes a stable, variegated, card-carrying carbohydrate that has much in in common with a very good stuffing. And who doesn’t like stuffing?
This is a playful recipe that can also animate a plate. I enjoy placing it under a formed medallion of veal brisket- the additional height gives the plate more theater.
These little starches can be dramatized with a turn in olive oil.
Like all good stuffings, they crust up beautifully. There’s a perfect naturalness to it all.
These simple, almost primitive ingredients have a magnetic attraction for each other. They also speak with candor: starches are innocent and honest eating.
Yield: 8 (with leftovers)
Special Equipment: small frying pan, lid, plastic wrap, aluminum foil
Have all the ingredients primed.
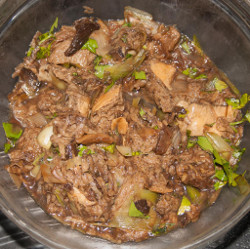
Place the soaked mushrooms in a colander over a bowl. Add the matzah farfel to the mushroom water, pressing it down to soak in all the liquids. Set aside.
Chop the mushrooms into small pieces.
Pour the olive oil into the pan. Over low heat, add in the chopped leeks, mushrooms, fresh (or dried) thyme, salt and pepper. Stir.
Cover and sweat (but not color) the leeks. Cook for about 6-8 minutes. Cool to room temperature.
Drain the matzah farfel. Discard any liquid. Put the farfel back into its bowl.
Shred the potato directly into the soaked matzah farfel and stir.
Add in the beaten eggs. Stir. Add in the cooled, seasoned cooked mushrooms. Stir to combine.
Finishing:
Place the box of plastic wrap at the top of the cutting board.
Tear off a sheet of plastic wrap, at least 12” x 15”. Promptly lay it down flat onto the board. Place 1½ - 2 cups of pudding spread evenly about an inch from the longer edge.
Fold the edge over the filling and keep rolling, using the ends to tighten the filling as you go, forming a log.
Repeat, using up the filling.
Wrap each roll in aluminum foil. Twist and tighten the ends, tailoring the filling. Curl the ends so the roll fit into the cooking pot.
Place the filled logs into an empty pot and fill with water. Place a plate over the logs to insure they stay submerged.
Bring the water to a simmer and cook for ½ hour. Place the cooked, enclosed logs on paper towels. Cool.
Use scissors to cut both ends off and un-wrap the entire log.
Serve:
The Wild Mushroom Pudding can now be used as a side dish.
Cut it into 2” portions and place in an oiled casserole. Reheat covered in foil. or: Crisp and brown in a non-stick skillet in a light film of olive oil. Don’t crowd the pan.
Serve with roasted chicken or your favorite brisket. They like a sauce!
with Orange-Chocolate Almond Crumbs
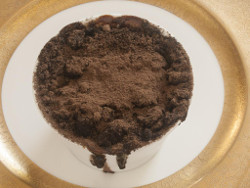
This delicious recipe comes together fast.
What makes this cobbler so unique is the rich chocolate crumb topping. It will supply what we love about cobblers: a cooked fruit filling with a crumbly topping.
Chocolate is here in spades. It’s in the crumbs and it’s laced among the fruit.
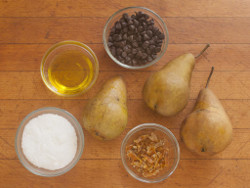
I like to really pack my fruit inside the mold, so I prepare a dense, copious fruit filling. This happens best when the fruit is thinly sliced. A kitchen tool, called a mandoline, does the thin slicing handily.
Speaking of hands, just slip a gloved potholder over your slicing hand for extra safety, if you are at all concerned.
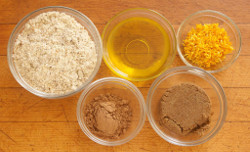
The chocolate crumbs are made with cocoa, almond flour, brown sugar, olive oil and orange zest.
I like the citrusy edge of orange with chocolate. I use candied orange in the filling and orange zest in the crumbs. No candied orange? Just double the zest.
The pear filling is packed densely into the mold(s) and the crumbs are liberally distributed. A good cobbler will have juice bubbling over the sides. This one is no different.
I serve individual cobblers- but don’t hesitate to make a family one. It tastes just as divine.
The recipe easily doubles.
Yield: 6 servings (recipe easily doubles)
Special Equipment: melon baller (for coring the fruit), mandoline with slicing plate, bowls, individual 1 cup molds or baking dish, pastry brush, parchment paper or foil, baking sheet
Fruit Filling:
Chocolate Almond Crumbs
Garnish: Unsweetened cocoa powder, sprinkled
Wash and core the pears. Assemble the mandoline, using the thinnest slicing blade, and place over a mixing bowl. Slip on a gloved potholder.
Proceed to slice the pears from the bottom up. Quit an inch before the stem. Repeat with the remaining pears.
Add in all the remaining ingredients. Mix with your hands. Set aside.
For the crumbs: pour the olive oil into a mixing bowl. With your fingers, rub the ground almonds (almond flour- it’s okay to have some almond pieces), dark brown sugar, dark cocoa powder and orange zest together to form coarse crumbs.
Finishing:
Preheat oven (convection if available) to 350 ºF.
Line a baking sheet with parchment or foil.
Brush inside the mold(s) with olive oil.
Pack the mold(s) densely with the pear filling. Leave a ¼” head room. Spread the chocolate crumbs evenly over the surface of the pears.
Baking:
Set the mold(s) upon lined (foil or parchment) baking sheet.
Bake in the center of the oven. The cobbler(s) will bubble over a little- it's what you want.
Bake the 1-cup molds about 30-35 minutes. Bake family-sized molds for about 1 hour.
Cool to warm.
Serving:
The cobbler tastes best served warm.
Right before serving, sprinkle the crumbs with dark cocoa.
Note: the cobbler(s) can be baked in the morning and reheated for dinner service. Reheat in a preheated warm 325 ºF oven for 20 minutes. Do not serve too hot.
Excerpted from Remaining Kosher Volume Two