 Iran’s Attack on Israel

8 min read
Here are some of my family’s favorites for the holiday of Sukkot.
Serves 6
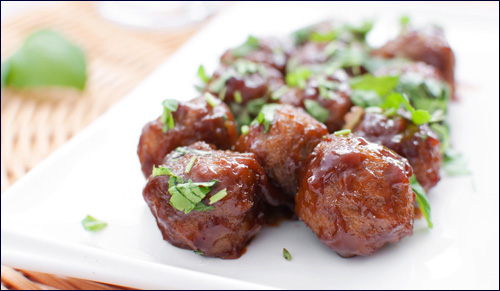
This great recipe is based on my regular meatball recipe with cranberry sauce and a bit of wine added. The flavor is unique and turns ordinary meatballs into a real specialty! You can make the meatballs any size you like; I think it looks (and stretches) best when the meatballs are tiny, but if you're short on time, you needn't worry about their size.
Ingredients
*If you use kasha, quinoa or bulgur, soak the grains first in ¾ cup very hot water for 15 minutes to soften before adding to meat mixture; then drain. Breadcrumbs do not need to be soaked.
Method
Mix together the ground beef, ground chicken, and diced onion and garlic. Add in the eggs and 1/2 cup of softened grain. Mix and if you are not making the meatballs right away, cover the bowl and let it chill in the fridge.
Using a large frying pan, sauté the additional chopped onion in the 2 tablespoons of oil on a low flame and while it is sautéing. Form balls out of the meat mix and add to the slowly sautéing onion. Let them brown for about five minutes, turning once to brown on the other side. Remove the meatballs to a plate. Keep forming meatballs and browning them until you have finished all the meat mixture.
Prepare the sauce in a deep pot:
Stir sauce ingredients together to smooth out any lumps and simmer on low. Add the meatballs, and simmer for 1 – 1.5 hours. This recipe freezes well. Serve over a bed of brown rice, cooked quinoa or cooked and fluffed bulgur.
To Your Health – With a Great Salad
Sometimes we get overwhelmed by all the constant talk about healthy foods, eating enough of them, finding the time to change our diets and include more of the important foods…Well, here’s a great salad that is nutritious, wholesome, tasty and best of all, beautiful & easy to serve.
Serves 6
Ingredients
Method
Prepare the onion, leeks, pepper, beets and fennel and cut them as directed. Put them all in a bowl and toss them together with the pepper, garlic powder and olive oil.
Preheat the oven to 375°F / 190-200°C.
Layer the vegetable mix into a lined baking pan. Pour the wine over all. Bake this until the beets are softened, about 45 minutes. If the vegetables start to dry out, spray them with oil spray and stir. Remove from the oven and let it cool. Place it in a plastic container with a lid to refrigerate until serving.
To serve, toss together the greens and the red onion. Divide the greens among the six salad plates; spoon the roasted beet mix on each plate. This does not need additional salad dressing as it is quite tasty and healthy as is. If you really, positively feel you must add more dressing, then you can choose to drizzle a bit of olive oil and fresh lemon juice on each plate, along with a small pinch of real sea salt – but the salad really does taste wonderful as is. We had nothing left of this one just as soon as the photos were done…
Whether you want to gift someone who is hosting you for a yomtov meal with that special something, a pretty stand-alone cake can be just the thing. Here’s a recipe that’s been in my family for literally years and every time it’s served it is enjoyed down to the last crumb.
Yield: One cake 10 – 12 inches in diameter
To begin: Hand-grate 7 oz. (200 grams) good quality Pareve chocolate. Set aside.
Remaining ingredients:
Method
Separate the eggs. Place the whites in the mixing bowl and beat on high until they become white; as they stiffen, add in 1 cup of the sugar and the baking powder and baking soda and finish beating this in. Turn off the beaters and set aside.
Place the yolks in another bowl. Beat on high so they begin to turn light yellow; add in the rest of the sugar, cinnamon, oil, vanilla and the coffee-water mix. Turn down the speed and add in the flour. Mix only until smooth. Turn off the mixer.
Fold the whites into this thick batter until completely incorporated. Add in most of the grated chocolate, leaving about 1/4 cup of it over for the topping of the cake. Fold this in and the batter is ready.
Pour the batter into an ungreased 10-12 inch round tube pan (NOT a bund pan, it will not come out nicely!) Place the cake in the center of your oven and remove any racks that would be on top of it as it will rise quite a bit.
Bake at 325°F / 170°C for 45-50 minutes until done in its center.
Remove from the oven and let it rest on its side while still in the tube pan, for 15 minutes. After that, gently turn the pan to the other side and let it continue to rest like that until cooled. Release by running a long sharp knife around the edges and around the tube. Place on a nice plate before going on to the next step.
Chocolate glaze:
Place this all together in a small bowl and mix by hand with a spoon. If the glaze is very runny, add in more powdered sugar until you have a thick glaze. If it is too thick add in bits more hot water until you have reached the desired consistency.
When the cake is completely cooled pour this glaze all over its top and allow it to drip down the sides and the center. Sprinkle on the remaining grated chocolate (or make some chocolate curls too!) to the top of the cake while it is still wet. Freeze open until hardened. Wrap gently in foil until the day you want to serve it. Let it defrost unwrapped so that the glaze will not get stuck to the foil. Serve as a centerpiece cake.
Since Challah is my pet subject, I’d like to conclude with an easy tip or two for homemade challahs…
Challah Tip – That Shiny Glaze
Reader question:
My challahs come out kind of dull looking, with no real shine to them. Is there a better way to bake them so that they will come out shinier and glossier after being baked? And what can I top my challahs with that will make them different for this time of year? I wanted something a bit more than just my ordinary poppy seeds…
Answer:
You’ve asked me how to get your challahs to shine. Well, the ordinary answer is to use beaten eggs. I do an egg wash with 2 whole eggs, beaten with a fork inside a glass. I then smear my challahs generously with this wash directly before they go into the oven. If you are stingy with your egg wash, your challahs may have missing spots on them and this will make them appear duller.
I just learned another interesting tip from a friend: you can add in 1 teaspoon sugar plus a teaspoon of finely granulated coffee “dust” (the kind of granules that are so fine they look like powder) to your egg wash. I know it sounds a bit weird but it really works! You just mix it all together, making sure to beat it with the tines of your fork and then using a pastry brush, brush it over your risen challahs right before they are baked.
If you’d like to have my challah recipes, you can try these out:
Just One Challah for those of you who just want to ‘try it out’ before doing a larger amount.
And for those of you who want the full size recipe so you can be separate challah with a blessing try my recipe for the Incredible Challah Dough!